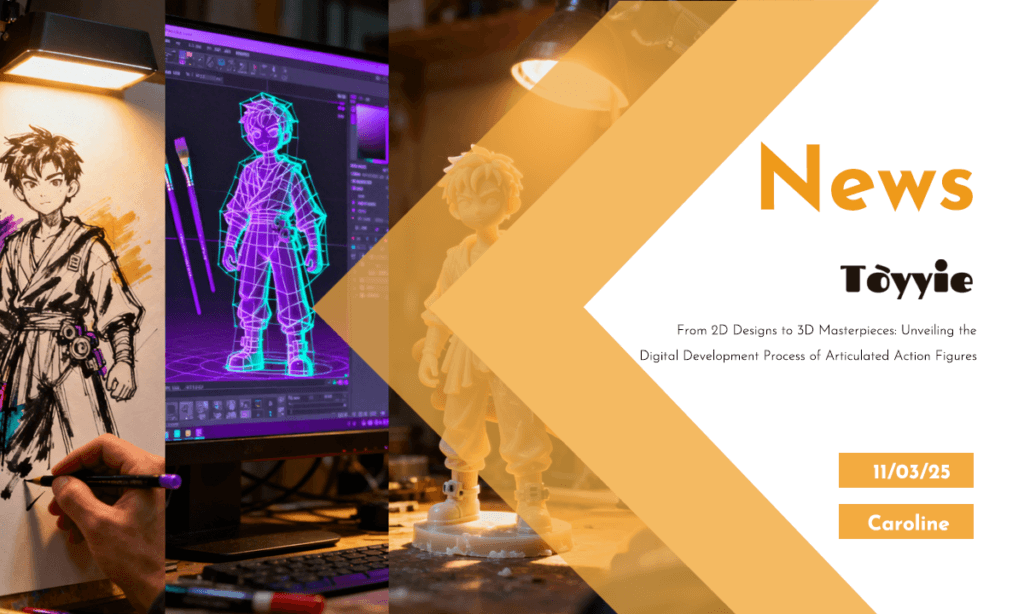
✨ The Birth of an Idea: From Concept to 2D Design
Every action figure starts with an idea. Whether it’s a superhero, a historical figure, or an original character, the first step is always the same—conceptualization. This is where the magic begins. For me, this phase is both thrilling and nerve-wracking. It’s thrilling because you get to imagine a whole new world, and nerve-wracking because you know that every decision you make here will have a ripple effect throughout the entire project.
1️⃣ Sketching the Basics
The first thing I do is sketch out the basic shape and proportions of the character. This is a crucial step because it sets the foundation for everything that follows. I use pencils and paper for this, as there’s something about the tactile nature of drawing that helps me think more clearly. The sketches don’t have to be perfect, but they need to capture the essence of the character—their personality, their posture, and their overall vibe.
2️⃣ Refining the Design
Once I have a rough sketch, I move on to refining the design. This involves adding details, such as facial features, clothing, and accessories. I also think about how the figure will move. Articulated action figures need to be functional, so I have to anticipate how each joint will work and how the design will accommodate those movements.
During this phase, I often consult with my team. They bring in a fresh perspective, and together, we iterate on the design until we’re all satisfied. It’s a collaborative process, and every opinion counts.
🖥️ Transitioning to 3D: The Role of Digital Sculpting
After the 2D design is finalized, it’s time to bring the character to life in 3D. This is where things start to get really exciting. The transition from 2D to 3D is a delicate process, and it requires a blend of artistic skill and technical know-how.
1️⃣ Choosing the Right Software
The first step in creating a 3D model is choosing the right software. There are several options out there, but I personally prefer ZBrush. It’s a powerful tool that allows for detailed sculpting and is widely used in the industry. Other popular choices include Blender, Maya, and 3ds Max.
I remember when I first started using ZBrush. It was intimidating at first, with its myriad of tools and options. But once I got the hang of it, I fell in love with the program. It’s incredibly versatile and allows for a level of detail that’s hard to achieve with traditional methods.
2️⃣ Blocking Out the Form
The 3D process begins with what’s called “blocking out” the form. This involves creating a rough 3D version of the character, focusing on the overall shape and proportions. It’s a bit like creating a wire frame, but in 3D space. This stage is all about getting the basics right—making sure the character stands correctly, has the right balance, and looks proportional.
3️⃣ Adding Detail and Refinement
Once the basic form is established, I start adding details. This is where ZBrush really shines. I use a combination of sculpting tools to add fine details, such as wrinkles, folds, and textures. It’s a slow and meticulous process, but the results are worth it. Each detail adds to the character’s overall personality and makes the figure feel more lifelike.
During this phase, I also think about how the figure will be articulated. I make sure to leave space for the joints and plan the movement of each limb. It’s like solving a puzzle, and it requires a lot of forethought.
🖨️ From Digital to Physical: The Art of 3D Printing
At this point, the character exists only in the digital realm. To bring it into the physical world, I need to create a 3D print of the model. This is a critical step because it allows me to see how the figure will look and feel in real life.
1️⃣ Preparing the Model for 3D Printing
Before I can print the model, I need to prepare it. This involves “cleaning up” the 3D file—ensuring that there are no errors, such as overlapping polygons or gaps. I also need to scale the model to the correct size and make sure it’s watertight (meaning it’s a complete, enclosed shape).
I use software like Blender or Meshmixer for this task. It’s a bit technical, but it’s essential for ensuring a successful print. Once the model is ready, I export it as a .stl file, which is the standard format for 3D printing.
2️⃣ Choosing the Right 3D Printing Materials
The next step is choosing the right material for the print. There are many options available, each with its own properties and uses. For action figures, I typically use a durable resin material. Resin prints are detailed and have a smooth finish, which is perfect for capturing all the fine details of the 3D model.
I remember the first time I saw a resin print of one of my designs. It was a surreal experience, seeing something that had only existed in my imagination come to life in my hands. The level of detail was astonishing, and it gave me a newfound appreciation for the 3D printing process.
3️⃣ Post-Processing the Print
After the print is complete, it needs to be post-processed. This involves removing any supports that were used during the printing process and smoothing out the surface. I use a combination of sanding and resin-smoothing compounds to achieve a high-quality finish.
This part of the process can be messy and time-consuming, but it’s essential for getting the best results. I often think of it as the final touch-up on a masterpiece—it’s what separates a good print from a great one.
🧩 Creating the Prototype: The Finishing Touches
Once the 3D print is ready, it’s time to create the prototype. This involves adding any final details, such as paint, decals, and articulation. It’s the last step before the figure goes into mass production, and it’s where all the hard work pays off.
1️⃣ Painting the Figure
One of the most exciting aspects of creating a prototype is painting the figure. This is where the character really comes to life. I use a combination of airbrushing and hand-painting to add color and highlights. It’s a delicate process, and it requires a steady hand and a keen eye for detail.
I remember my first attempt at airbrushing. I was so nervous, terrified that I would ruin the print. But as soon as I started, I found that it was like painting with a very precise and delicate brush. It was challenging at first, but with practice, I got the hang of it.
2️⃣ Adding Decals and Accessories
In addition to painting, I also add any decals or accessories that the figure might need. This could include patches, insignias, or weapons. Each element needs to be carefully applied to ensure a professional finish.
I’ve learned that attention to detail is key here. A small mistake can ruin the entire figure, so I take my time and double-check everything. It’s a bit like putting together a puzzle, and it’s incredibly satisfying when everything comes together perfectly.
3️⃣ Articulation: Making the Figure Move
Finally, I focus on the articulation—ensuring that the figure can move in the way it’s supposed to. This involves adding joints and making sure they function smoothly. It’s a bit like building a tiny mechanical doll, and it requires a lot of precision.
I use a combination of ball joints and hinge joints, depending on the design. Each joint needs to be strong enough to support the weight of the figure but still allow for a range of motion. It’s a delicate balance, and it’s one of the most challenging aspects of the process.
🏭 Mass Production: Bringing the Figure to Market
Once the prototype is complete and approved, it’s time to move on to mass production. This is where the figure is replicated thousands of times, ready to be sold to collectors and fans.
1️⃣ Tooling and Injection Molding
The first step in mass production is creating the tools needed to produce the figure. This involves creating a mold of the prototype, which is then used to produce the final product. The mold is made of a durable material, such as steel or aluminum, and it’s designed to withstand thousands of uses.
Injection molding is the process used to create the final figures. Molten plastic is injected into the mold under high pressure, and then it’s allowed to cool and harden. The result is a highly detailed and precise replica of the prototype.
I’ve had the opportunity to watch this process in action, and it’s truly fascinating. The speed and precision with which the machines work is mind-blowing, and it’s incredible to see hundreds of figures being produced in a matter of minutes.
2️⃣ Quality Control
Before the figures are shipped out, they undergo a rigorous quality control process. Each figure is inspected for defects, such as scratches, air bubbles, or misaligned parts. Only the best figures make it to the final product, ensuring that customers receive a high-quality item.
I’ve been part of the quality control process, and it’s both challenging and rewarding. It’s challenging because you have to be extremely detail-oriented, but it’s rewarding to know that you’re helping to ensure that customers are satisfied with their purchase.
🎉 The Final Product: A Labor of Love
After all the hard work, the final product is something that I’m incredibly proud of. It’s a testament to the creativity, skill, and dedication of everyone involved in the process. Each figure is a labor of love, and it’s amazing to see it go from an idea in my head to a physical product that people can enjoy.
I’ve had the pleasure of seeing my figures on store shelves, and it’s an indescribable feeling. Knowing that people are admiring and playing with something that I created is incredibly rewarding.
📚 My Personal Journey: Lessons Learned Along the Way
Throughout this journey, I’ve learned a lot about myself and my craft. One of the biggest lessons I’ve learned is the importance of perseverance. There are times when the process feels overwhelming, and it’s easy to get discouraged. But I’ve learned that if you keep pushing forward, you’ll eventually reach your goal.
Another important lesson is the value of collaboration. No one can do it all on their own, and it’s essential to have a team of talented and dedicated individuals who can support and inspire you. I’ve been fortunate to work with some amazing people, and I’ve learned so much from them.
Finally, I’ve come to appreciate the power of imagination. The ability to create something from nothing is a gift, and it’s something that I never take for granted. It’s what drives me to keep creating, even when the process is challenging.
🚀 Conclusion: The Future of Action Figures
As I look to the future, I’m excited about the possibilities that lie ahead. The world of action figures is constantly evolving, with new technologies and techniques emerging all the time. I’m eager to see how these advancements will shape the industry and open up new opportunities for creators.
For those of you who are just starting out in this field, I encourage you to keep pushing the boundaries of what’s possible. The journey from 2D design to 3D action figure is a challenging one, but it’s also incredibly rewarding. With dedication, creativity, and a willingness to learn, you can bring your ideas to life and create something truly special.
Thank you for taking the time to read my story. I hope that it has inspired you in some way and given you a glimpse into the fascinating world of action figure development. If you have any questions or would like to share your own experiences, please don’t hesitate to reach out. I’d love to hear from you.
Until next time, happy creating!
And there you have it—a detailed, personal, and engaging account of the journey from 2D designs to 3D action figures. I hope you found it informative and inspiring, and that it has shed some light on the incredible process of bringing these collectibles to life. Remember, the key to success is perseverance, collaboration, and a whole lot of imagination. So, keep creating, and who knows—maybe one day, your designs will be the ones gracing store shelves and bringing joy to collectors everywhere.