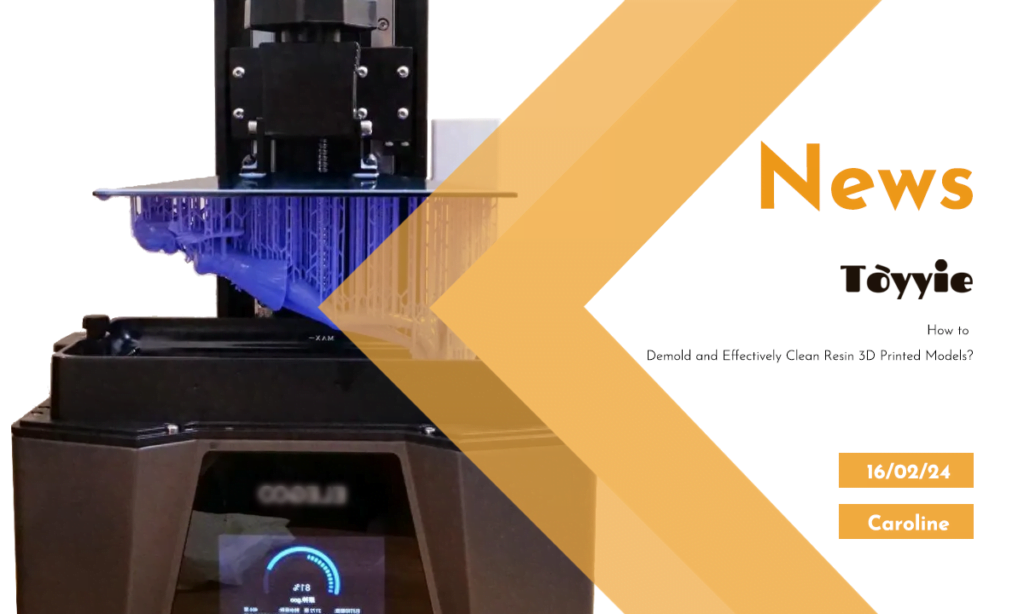
Demolding Steps
Handle with Care:Exercise caution during the demolding process to avoid damaging the model or support structures. Use tools gently, ensuring no additional pressure or scratches on the model’s surface.
Common tools include
Model scissors or trimming knife
For trimming and cleaning support structures from the model’s surface, ensuring the model’s overall integrity.
Needle-like tools
To delicately clean tiny leftover parts of support structures, especially in intricate model details.
Scraper or spatula
For gently scraping off residual supports or incomplete sections, ensuring a smooth surface.
Model fixtures or clamps
Used to secure the model, preventing sliding or movement during cleaning.
Brush
For clearing residues on the model’s surface, such as leftover resin or support structure debris.
Safety gloves
Used during the cleaning process to protect hands from resin residues or cleaning liquids.
Polishing cloth or sponge
For gently polishing the model’s surface, making it smoother.
Compressed air can or air pump
For blowing off the model’s surface, clearing potential tiny particles.
Layer-by-Layer Detachment
Handle with Care:Exercise caution during the demolding process to avoid damaging the model or support structures. Use tools gently, ensuring no additional pressure or scratches on the model’s surface.
Start from the bottom
If possible, begin detaching layers from the model’s bottom, typically because the model’s base is relatively flat and easier to handle. Move layer by layer, ensuring each one separates smoothly.
Use tools
Use appropriate tools such as model scissors, trimming knives, or small pliers to detach support structures layer by layer. Handle with care, ensuring no additional damage to the model.
Check layer by layer
Inspect each layer’s support structures carefully, ensuring they detach layer by layer. Pay attention to support parts that might hide in tiny structures to avoid overlooking them.
Gentle rotation and twisting
For complex-shaped models, gently rotate and twist to gradually detach supports. This requires patience and careful handling to avoid excessive force.
Temperature control
In some cases, gently heating support structures might make them easier to detach. Warm airflow or a heater can be used, but caution is needed to prevent affecting the model itself.
Step-by-step cleaning
Simultaneously with layer-by-layer detachment, clean the model’s surface step by step to ensure no residual parts of support structures adhere to the model.
Observe support structure design
While designing the model, consider the design of support structures to make layer-by-layer detachment more manageable. Avoid overly complex or tightly packed support structures to improve demolding efficiency.
Try different directions
If one direction proves challenging for detachment, try changing the direction. Sometimes, adjusting the detachment direction can reduce resistance.
Support Removal
Carefully remove support structures using appropriate scissors or tools. Ensure complete removal of support structures while avoiding unintended harm to the model.
Cleaning Steps
Use Washing Solution
Place the model in a washing solution, typically using isopropyl alcohol (IPA) or specialized 3D printing resin cleaning solution. This helps remove residual resin and support structures. Ensure the model is fully immersed in the cleaning solution for optimal cleaning.
Appropriate Cleaning Time
Cleaning time depends on the cleaning solution and resin type, usually ranging from 5 to 10 minutes. Excessive cleaning time may result in model softening or surface damage, so adhere to the manufacturer’s recommendations.
Gentle Brushing
Use a soft brush to gently scrub the model’s surface, ensuring the cleaning solution covers all areas. Pay special attention to traces left by support structures and detailed parts of the model.
Secondary Cleaning
After the initial cleaning, perform a secondary cleaning to ensure complete removal of resin residues. Use clean cleaning solution or water for a final rinse.
Drying and Inspection
Air Drying
Place the cleaned model in a well-ventilated area for natural air drying. The suitable temperature range is typically between 20 degrees Celsius (68 degrees Fahrenheit) and 25 degrees Celsius (77 degrees Fahrenheit). This temperature range promotes water evaporation from the model’s surface without causing excessive heat-induced deformation.
Detailed Inspection
Once the model is dry, carefully inspect its surface to ensure no remaining resin or support structures. For projects requiring higher standards, consider using a magnifying glass or lighting to examine tiny details.
Post-Processing
Grinding and Finishing
If necessary, perform grinding and finishing to eliminate defects that may occur during the printing process. Use fine sandpaper or sandpaper for gentle sanding, followed by gloss finishing to make the surface smoother.
Five tips for grinding
Choose the right sandpaper
Select sandpaper with the appropriate grit according to the needs. Typically, start with coarse sandpaper and gradually transition to fine sandpaper to address different levels of defects.
Gentle technique
Use a gentle technique for grinding, avoiding excessive pressure to prevent scratching or wearing down the model’s surface. Consistent and even movements are usually more effective than excessive force.
Water-immersed grinding
For specific resin models, consider using water during grinding. Water reduces dust, keeps the workspace clean, and helps prevent the model from overheating.
Use lubricants
During grinding, applying some lubricant, such as water or specialized grinding fluid, helps reduce sandpaper wear and makes the grinding process smoother.
Gloss finishing
Use gloss finishing tools, such as rubber wheels, to delicately refine the surface after grinding, making it smoother.
Coloring and Decoration
According to the design intent, color or decorate the model to enhance its appearance. Use suitable pigments and techniques to achieve the desired effect.
Conclusion
By following these guidelines and steps, you’ll be able to achieve outstanding results in the Resin 3D printing field. This technology provides a unique opportunity for toy designers and artists to transform their creativity into exquisite tangible artworks. Wishing you tremendous success in your journey through Resin 3D printing!